

By Paul Dunwell, writing for EasyFrame
© Copyright EasyFrame 2019
What this article is about
Earlier 'Frame Academy' pieces covered terminology, making a frame, gilding, choosing a type of frame, reusing old frames, choosing mat and moulding colours, hanging heavy artwork and hanging at the correct height. 'Frame Academy IX' tells you how to hang pictures on the stairs so that they look well arranged.
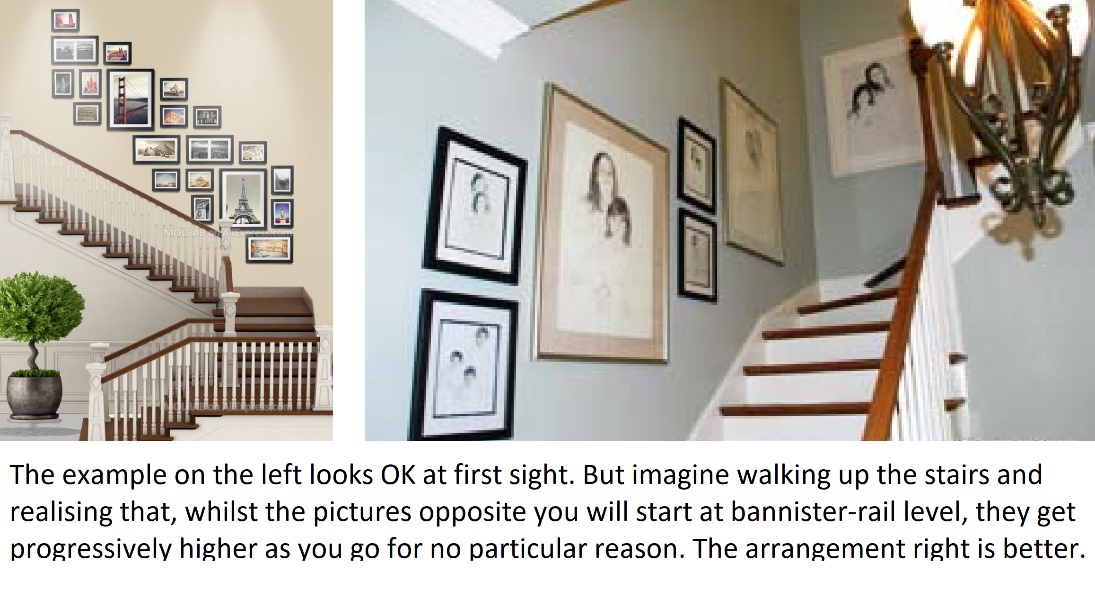
The problem
We're surrounded by images of perfectly aligned pictures beside staircases. Yet it's harder than you might imagine to hang work there and make it look good.
Rules of thumb
These may not suit everybody or every staircase, but they make sense.
- Set yourself rules. You'll have to try them and perhaps adjust them. The eye spots randomness that doesn't work very quickly, while a regular arrangement is less likely to jump out as a failure.
- Fix a height. You might assume, for example, that the bottom or the middle of every frame will be 4 feet above the stair below it, with the centre of the frame over the centre of the stair.
- Unify the frames. In most cases the frames should tie the collection together. You could have everything reframed in the same materials, even in different sizes. EasyFrame could put the whole lot into three or four sizes of matching frame.
- Stretch a string. Run it from the 4-foot level above the top stair to the same level above the bottom stair, adapting for any turns. The line marks the bottom or middle of each frame, according to your rules.
- Count stairs and pictures. Stand the works on the stairs they might hang above. You might end up with one every three stairs, one every second stair, two per stair, or a pair every second stair. You might skip the first few stairs to concentrate on the middle. Play with the possibilities and compare.
- Consider the running order. Photos of one family member could be chronological. Works of different sizes could rise to the biggest in the middle and fall away again, run from smallest at the bottom to largest at the top, or follow a pattern such as big, small, small, small, big.
- Think horizontally, not vertically.
- Make the fixings extra secure. Stairs vibrate, and so do the walls beside them. You can even double the fixings up.
- Use placeholders for heavy or awkward pictures. Cut card to the size and shape of each frame and hold it in position with low-tack tape, above the centre of the stair and touching the string.
- Fix through the placeholders. When the whole sequence looks right, put each fixing through its placeholder into the wall at about 45 degrees, then remove the card.
For more suggestions and some illustrations, see www.scrapnframes.com/SITE_EN/FRAMING/StairwayArrangement.html and www.hunker.com/13412396/the-best-way-to-hang-pictures-going-up-stairs.
Conclusion
Hanging artwork in the right position matters, because you and your guests or colleagues want to enjoy it. It's harder on the stairs than anywhere else, so apply some logic to your scheme.
If you are framing something precious, it's always worth going straight to a professional framer like EasyFrame for advice. They can do the whole job or help with the part that has left you racked by self-doubt. They can also help you unify your collection and supply picture-hanging hooks and hangers as well as mounts and frames.
EasyFrame is on 01234 856 501 and sales@EasyFrame.co.uk.